Pond plants for bumblebees … on my roof terrace!
14 March 2022
By Katrina ‘Tree’ Thuis, Bumblebee Conservation Trust volunteer ambassador
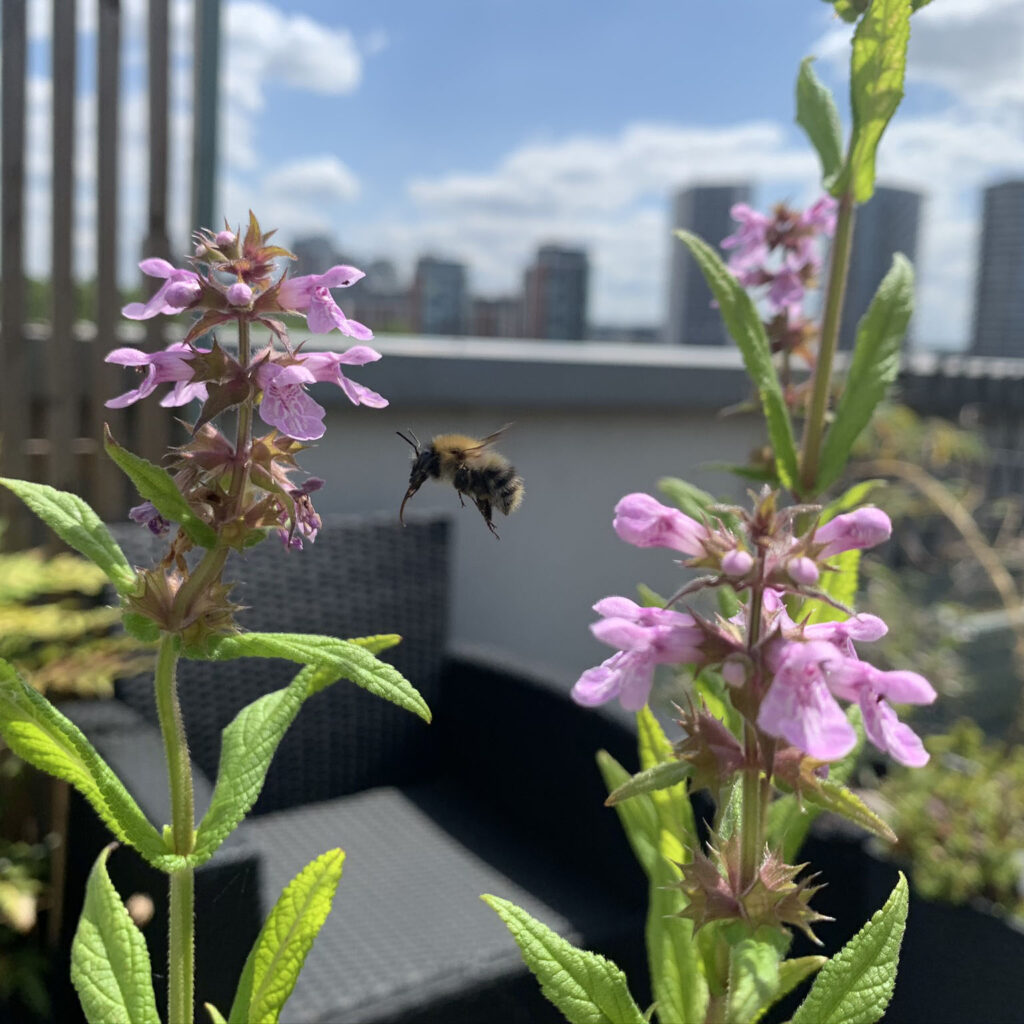
I live in a top floor flat in East London and have a little roof-terrace, or as I call it, my bee-balcony!
Early in 2020 I had a problem with some of my planters filling up with rainwater, and a little voice inside my head started telling me that although weight restrictions on my building’s roof meant I couldn’t have a proper pond up here, perhaps this was Nature, nudging me to try out a bit of water-loving bee-friendly planting. What had I got to lose by listening to that little voice?
First, I had to read up a little on the differences between ‘bog’ plants and ‘marginal’ plants. I admit I used to mash them all together in my head and assumed they’d all be fine in the water. It seems that bog plants like acidic soil and to be damp but not permanently saturated, and marginal plants are fine with being in the water, but also with lower water levels, as long as their roots have access to it deeper down. I therefore decided that marginal plants would be the best choice for my purposes.
Did you know? ‘Marginal plants’ are called this because they often grow around the margins (edges) of ponds where the water is shallow!
My inadvertent attempts at cultivating an aquatic tomato plant had failed miserably… so I emptied out the planters for a new project!
I found a website which seemed to have exactly what I needed – a collection of 10 marginal plants, with the option of also including the soil and gravel needed. To be sure I was using the right stuff, I went for the full package. The plants are nearly all native to the UK and were selected with bees in mind. The plants also covered a long flowering period, which is one of the key things we need to bear in mind when planting for bees and other pollinators.
I cleared out two of the waterlogged planters (oh my, the pong was rather hefty!) and when my delivery arrived, I excitedly delved in to find a selection of baskets containing what looked like … mud. Perhaps a couple of leaves here and there. I lined them up outside and looked at them. How was this little lot going to keep my bees happy?
As I was documenting the experience for this blog, I ploughed ahead, determined to cover the highs and lows of the process, and began to place the pots into the containers I’d cleared out. If some of these were just twigs, then so be it. This was when I learnt my first lesson. I had underestimated the amount of space the plants would take up. Even channelling my finest Tetris skills, I just couldn’t fit all the pots into the two planters I had emptied out. Luckily, I was able to re-home the contents of another planter and use that as a third.
It should be noted that as I am in a top floor flat, this is not designed with general pond life in mind. If I had any chance of having frogs or newts etc visiting me, then it would be designed differently. I’d fall off my chair if I saw any amphibian here! And there’s no danger of hedgehogs or similar falling in, so I’ve not needed to install any ramps. This is purely intended to provide for pollinators, and if any of those decide to go for a paddle, there are plenty of stems for them to climb on to.
So which plants did I have…?
- Marsh marigold (Caltha palustris) – native, flowers March – June.
- Lesser spearwort (Ranunculus flammula) – native, flowers June – July.
- Water forget-me-not (Myosotis scorpioides) – native, flowers May – September.
- Blue flag iris (Iris versicolor) – non-native, flowers May – June (selected due to size for my planter).
- Purple loosestrife (Lythrum salicaria) – native, flowers June – August.
- Marsh woundwort (Stachys palustris) – native, flowers July – September.
- Gypsywort (Lycopus europaeus) – native, flowers June – September.
- Yellow loosestrife (Lysimachia vulgaris) – native, flowers July – August.
- Water plantain (Alisma plantago-aquatica) – native, flowers June – August.
- Flowering rush (Butomus umbellatus) – native, flowers July – September.
I also picked up a couple of oxygenating plants; some elodea and pepper grass.
Every so often I took a photograph so I could log how my endeavour was progressing. Those plants I’d described as ‘just twigs’ began to show signs of life, and over the months it all really started coming into its own. The transformation was so satisfying to watch unfold in front of me.
I admit, it wasn’t all plain sailing, and I had a bit of an algae issue at one point. I’d anticipated something like that would happen and had bought some pond snails which I hoped might help. I didn’t get them immediately, as I wanted some algae to build up for them to eat; I didn’t want to pop them in a fresh pot with nothing to get stuck into. At its worst, I used a bamboo cane and swirled it around as though making candy-floss to scoop it out. The warning would be to ensure that if manually removing algae, ensure you aren’t also removing any pond life such as your precious snails. I’ve read that popping what you’ve scooped out at the edge of the pond gives things a chance to climb back in. When I added my snails, there were one or two leaves of duckweed in with them. Now I have rather a lot of it, however, I believe its presence is helping to manage the algae, so I’m letting it be for now and just keeping an eye on the coverage.
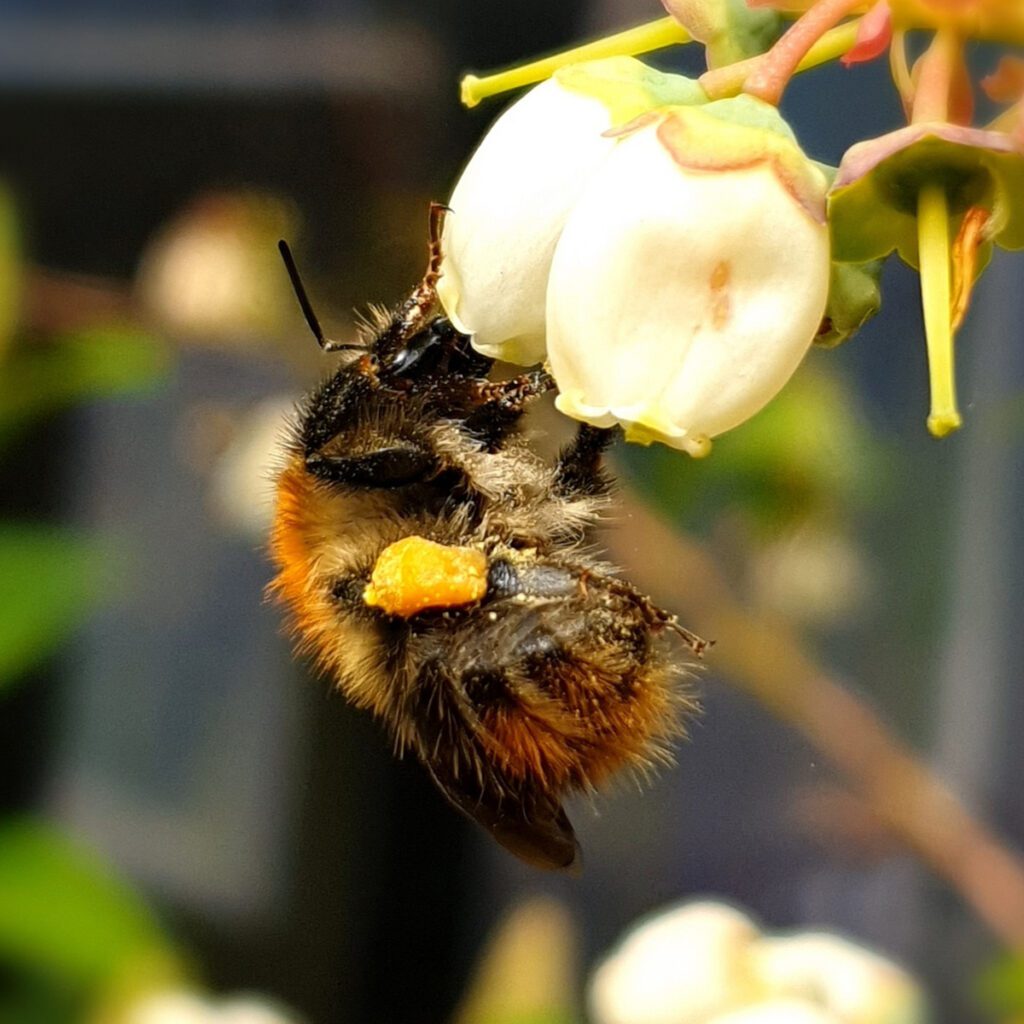
So, did I get any buzzy visitors? Did my efforts please some pollinators? Yes. I am bee-lighted with the results of this exercise! I had at least three different types of bumblebee visit my marginal planters – the Buff-tailed bumblebee (Bombus terrestris) was first, followed by Red-tailed bumblebee (Bombus lapidarius) and Common carder bees (Bombus pascuorum). I’d not seen Red-tailed up here last year so was very pleased to welcome them back to my balcony.
I also had other insects and pollinators swing by; the ladybirds enjoyed the greenfly, and I had various hoverfly types too, as well as some tiny bees. I tend to assume that any tiny dark bee is a lasioglossum species of solitary bee, but am never confident identifying the small ones. Perhaps one day.
The purple loosestrife features in a LOT of my pictures, that’s because it has a wonderfully long flowering period. It started in June and in September it was still making my bee visitors happy. It is now one of my new favourite bee-friendly plants. I’m certainly getting a lot of ‘bang for my buck’ from it.
So there we have it. I had a bee in my bonnet earlier in the year about setting up a pollinator-friendly marginal habitat in the skies of London and I had a stab at it. Is it something I would do again? Yes – it has been a fascinating journey for me. If I’m ever fortunate enough to move somewhere I can build a proper pond then I’d definitely do so. I did learn a bit from this exercise, and would like to share ‘Tree’s Top Tips’ with anyone interested:
- Don’t underestimate the space the plants will take up.
- Don’t worry if your plants don’t instantly impress – give them time.
- Select plants which will flower at varying points.
- Get some pond snails.
- Check the fill every so often and top up if rain isn’t forecast.
- BUILD IT AND THEY WILL COME!
Of course, being someone who enjoys planning the next project, I’m already turning my thoughts to what else I can do on my balcony!
Read more of Tree’s blogs on her website here.
More ways to help
Looking to create a bumblebee-friendly space? Check our our Bee the change resources here.
Dazzling dahlias – how to pot them up!
By Margaret Alston, ‘newbie dahlia enthusiast!’
Dahlias to me were always something other gardeners grew and were not for me! I thought they might be difficult and problematic perhaps, and I maybe even thought that they would not attract bumblebees. However, my mind has been changed after visiting beautiful National Trust gardens late last summer, where dahlias and bumblebees were plentiful. I have since then paid more attention to this, what now appears to be, fantastic long-flowering beauty. I have decided to give dahlias a chance in our garden this year and ‘Bee the Change’.
First of all, I needed to select which dahlias I would grow, and although you can grow dahlias from seed, I decided that tubers would be best for a beginner like me!
Selection was a bit of a minefield with no end of varieties and types. Bumblebees seem to love single-flowered dahlias, but also collarettes (with their tiny frilled collars) and anemone-flowering varieties (with their central ‘pincushions’) seem popular. They also vary greatly in height from maybe 40cm to well over a metre, with many that can be grown in pots. So, all in all, a great choice out there for flower and bumblebee lovers like me.
Bee the Change top tip! Look for dahlia varieties where the pollen is visible in the centre of the flower and not hidden by lots of dense petals. These are best for bumblebees and other pollinators.
I chose and ordered a variety of tubers to try out, mostly just one of each, which included all the above named types. While waiting for them to arrive, I prepared my pots … a selection of 2 or 3 litre ones, reused from garden centres, which I thoroughly scrubbed. At the garden centre, I chose some multi-purpose peat-free compost as the best option for the environment, and used it straight from the bag with no need to make up a mixture!
Once the tubers arrived I laid them out and wrote labels for each. The tubers vary greatly in size so the different sized pots are useful as the tuber needs to fit quite snugly in its pot. I filled each pot about a third with compost, then placed a tuber in and added more compost until only the old stalk was showing. It doesn’t matter if the stalk is not sitting centrally as it tends to move to the side itself!
I then put my pots into my unheated greenhouse and watered sparingly, according to instructions. I will continue to water every few days to make sure the compost stays damp.
Hopefully the tubers will sprout leaves and the dahlias will be ready to plant out in my garden by mid to end of May. My intention is to put them all into larger pots but we shall see… Follow me on Twitter @bumblebuddeez for regular updates or stay tuned for an update on my dahlias here!
Thank you for reading my blog and hopefully some of you will join me on my dahlia growing journey!
June update
After potting up my dahlia tubers in March, I thought that they might take perhaps a couple of weeks to sprout, but in fact they took several weeks! I visited them daily, anxiously watching for tiny signs of life. They seemed very dry… should I water them? I read that if they were watered too much, the roots would rot. In the end, I sparingly watered them sometimes, but still there were no signs of life!
Then, after seven weeks, just when I was giving up hope, I was relieved to see a tiny shoot. After that they gradually sprouted one by one… what delight with each new ‘birth’!
Now after ten weeks, I had some which seemed ready to put into their final position. Many people plant them straight into the garden but I had decided because of a munching snail problem to put them into containers.
Advice is usually to pot them into fairly large, maybe 20 litre, containers, but thinking about the amount of compost that would take, I decided to gather my larger containers and pot my dahlias according to size. For example, the single flowered ones should grow to about 45cm so would go into slightly smaller pots, while some of the collarette varieties I chose could grow to nearly a metre, so they would go into larger pots.
My peat-free compost mixture consisted of ‘multi purpose’ plus ‘mature plant’ with some perlite. In the bottom of the pots I put polystyrene pieces of old packaging or crocks then I potted up four of my precious plants. I will pot up the rest gradually over the next couple of weeks.
Now, coming back to this slug and snail problem. As my garden is completely organic and I rely on nature to create its own ecosystem, sometimes a helping hand is needed. Slugs and snails love to eat dahlias and so a barrier is necessary. I have tried various things but these organic barrier pellets (which they hate to walk over) plus copper tape round the pot, hopefully will do the trick! I have also tried wool pellets and have heard that holly leaves work well.
Now all I need to do is wait for my dahlias to flower – I can’t wait to see which varieties the bumblebees like most! Happy planting everyone!
September update
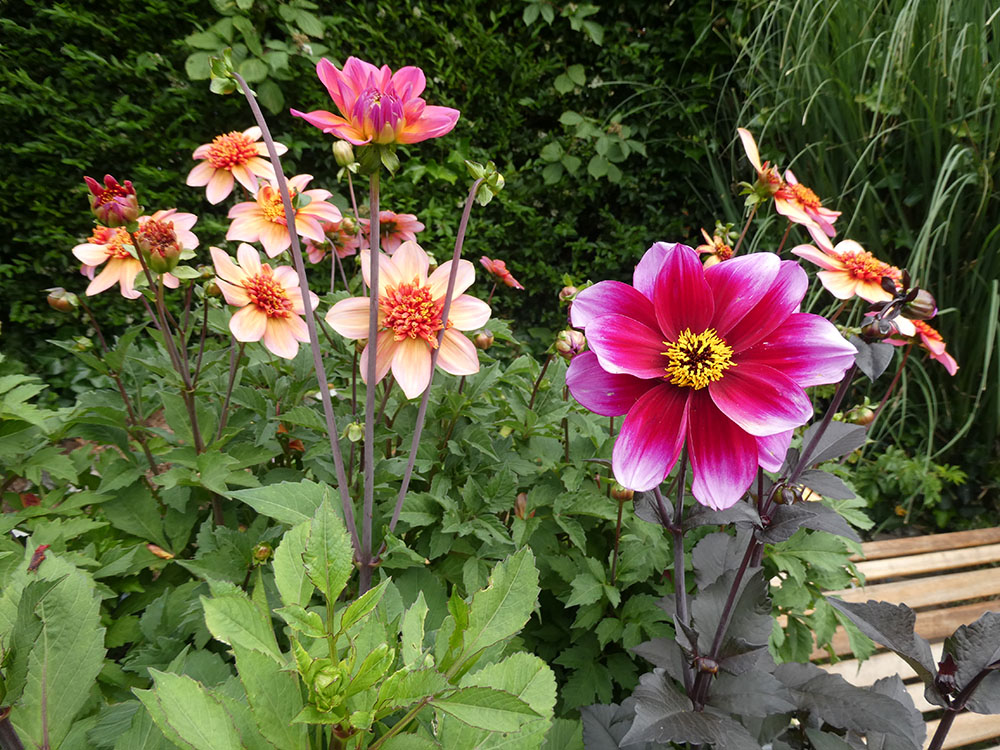
What a summer it has been… dahlias have certainly dazzled! After planting into pots at the end of May, just over a month later, at the beginning of July, they started to bloom, slowly at first then blooms and bumblebees came thick and fast.
I kept all the pots together on a ‘dahlia theatre’, an old lofty table that slugs and snails did not reach, to begin with, but as the season progressed I did place them among my borders when a space appeared.
As well as the ten tubers that I had planted into large containers, I also planted some seeds which quickly and easily germinated and were soon ready to plant out. Again, I put them into pots, out of reach of munching snails and they also started to bloom. I kept them all very well watered and fed them every couple of weeks with liquid seaweed.
My anemone flowering dahlias were beautiful but because of rather frilly and fussy centres, not so appealing to bumblebees, with one exception: ‘Totally Tangerine’, a beautiful long-flowering and bumblebee-attracting plant. For some reason, bumblebees just love it!
My collarette dahlias, ‘Kelsey Annie Joy’ and ‘Fashion Monger’ both performed extremely well, continue to flourish now, and have attracted many bumblebees. They are so beautiful with their little frilly skirts. I shall be treating myself to other varieties from this group next season.
The two single-flowered dahlias I grew from tubers, ‘Wishes and Dreams’ and ‘Happy Single Kiss’, again have been exemplary in their behaviour. They have bloomed and bloomed providing much food and resting places for bumblebees.
One thing that has been such a joy is a little packet of dahlia seeds, harvested then sent to me from a ‘Twitter friend’, Dotty’s garden. They were easy to grow and it was fun to wonder what colours/shapes would appear. I have constantly been deadheading all my dahlias but have now left some seed heads so that I may follow Dotty’s example by collecting and storing seeds for next year. I called my mixture ‘Dotty’s Dahlias’.
Many of my dahlias are still flowering and giving joy to anyone who visits my garden and the last few hungry bumblebees, striving to find the last drops of nectar. My ‘Dazzling Dahlias’ as I like to call them have been a success and I am hooked. I will attempt to store some of my tubers over winter, gather seeds, and I know in spring when gardening catalogues appear, I shall be choosing more… I already have a list of favourites!
Check out more planting guides and resources with our Bee the change campaign here.
My recipe for a buzzing garden
By Rowena Grew from South Lincolnshire
We can all do our bit for bees, no matter how small your pot or plot! We took on a large garden 13 years ago and it evolved with our family. Over the years it has had swings, slides, trampolines, ride-on cars and paddling pools, but it has ALWAYS had plenty of insect love. We enjoy nothing more than sharing our garden with “minibeasts” and pollinators a-plenty. It really is no trouble to create a haven for them in a space that can also be used for fun, relaxing and entertaining.
We have a large lawn that we could never keep weed free. It was a battle we never won and soon realised when we stopped fighting that nature won! In the summer our lawn is a blanket of beautiful clover flowers. They look and smell delicious, not only to us but to bees, lots and lots of bees! We can lie beside them and enjoy their merry buzzing while we immerse ourselves in a book with the sunshine on our faces.
Within our flower beds we have a pond and clumps of wildflowers, a much nicer term than ‘weeds’! Ragwort, red campion, teasels and coltsfoot all open up their flowers to insects and attract more beasties to our garden than the fancy horticulturally-created blooms. Of course we have those too, but there really is room for all! The giant mullein tower over the herbaceous beds and we watch the bright caterpillars fatten and one day disappear into the ground to emerge as moths.
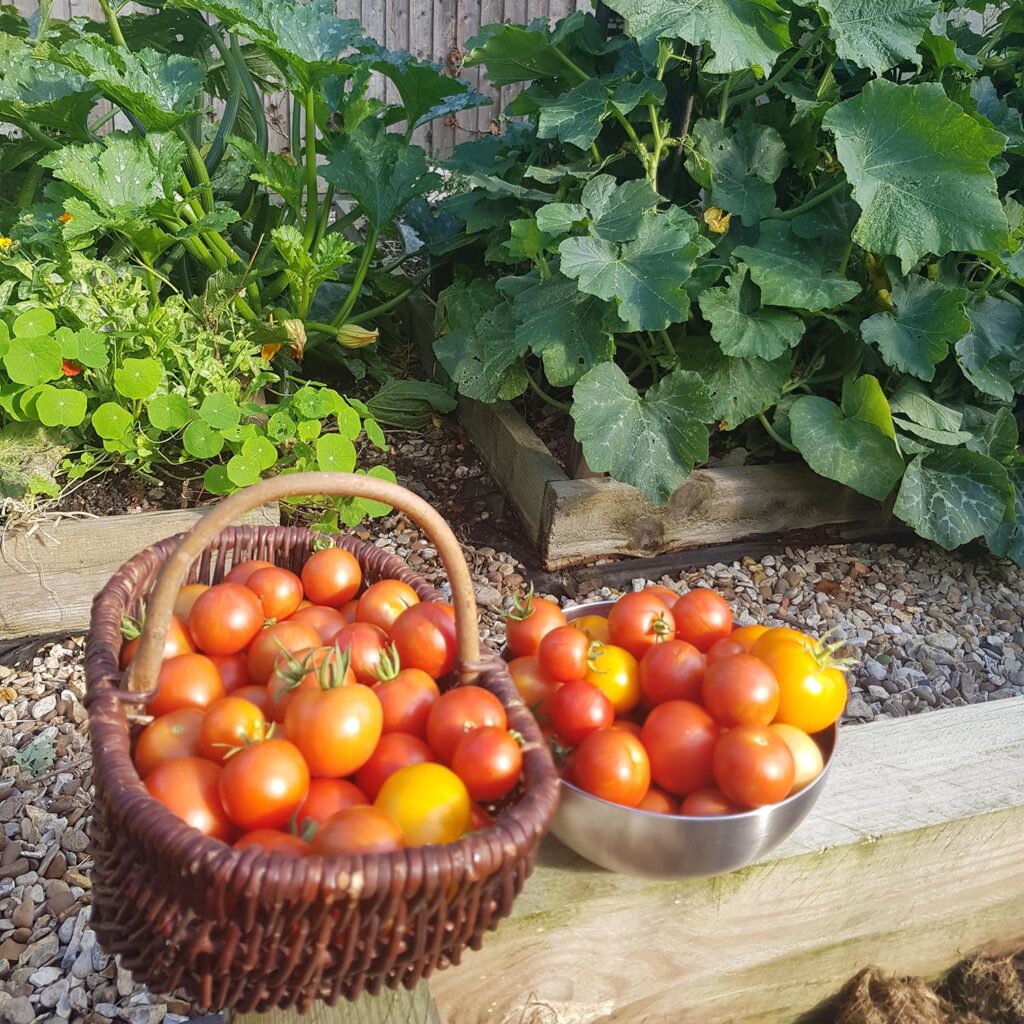
Growing food for the family – bumblebees love tomato and courgette flowers
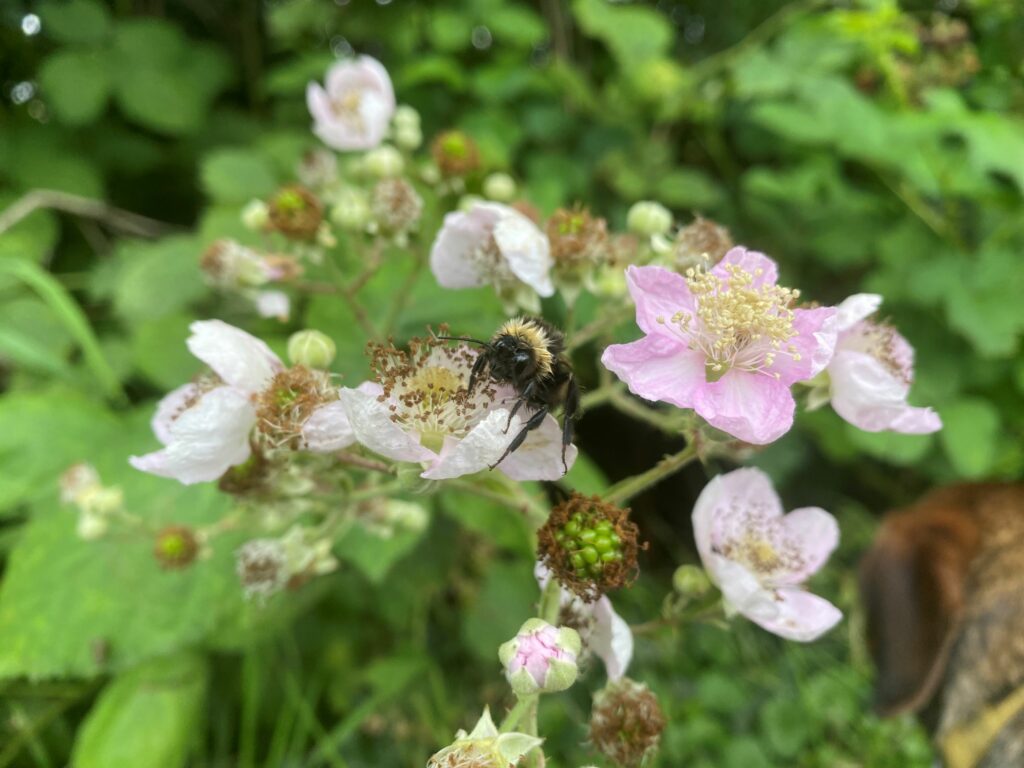
Our hedges are abuzz with ivy, clematis and forsythia. Kind on the eye and even kinder to our resident insects. We love having a colony of Tree bumblebees nest in our roof every year – they head straight for the hedges as they emerge from our fascia board on humming helicopter wings. Invertebrate gardening makes for an easy life too…don’t worry about clearing beds for the winter or removing the dead heads, the hibernators love those welcoming retreats.
I’m a great advocate of budget gardening; make cuttings, collect seeds, buy from fêtes, roadside stalls and garden gate sellers, especially if they’re in your neighbourhood, you know the plants will thrive in your soil type and climate as someone else did the trial for you!
Grow from seed – nothing can beat the privilege of watching a set of leaves emerge from a tiny seed, knowing you nurtured it and are now a proud plant parent! You’ll be amazed how easy it is and I can confirm before you’ve even started that you’ll be hooked when you get your first flowers or veg.
Fill your beds with self-seeding flowers and you’ll have guaranteed colour, insects and happiness all summer long. What could be more glorious than a display of glowing sunflower faces covered in furry bottomed bees? Happy invertebrate gardening! May your blooms be full of wildlife and your heart full of pleasure.
Growing pollinator-friendly flowers on my balcony
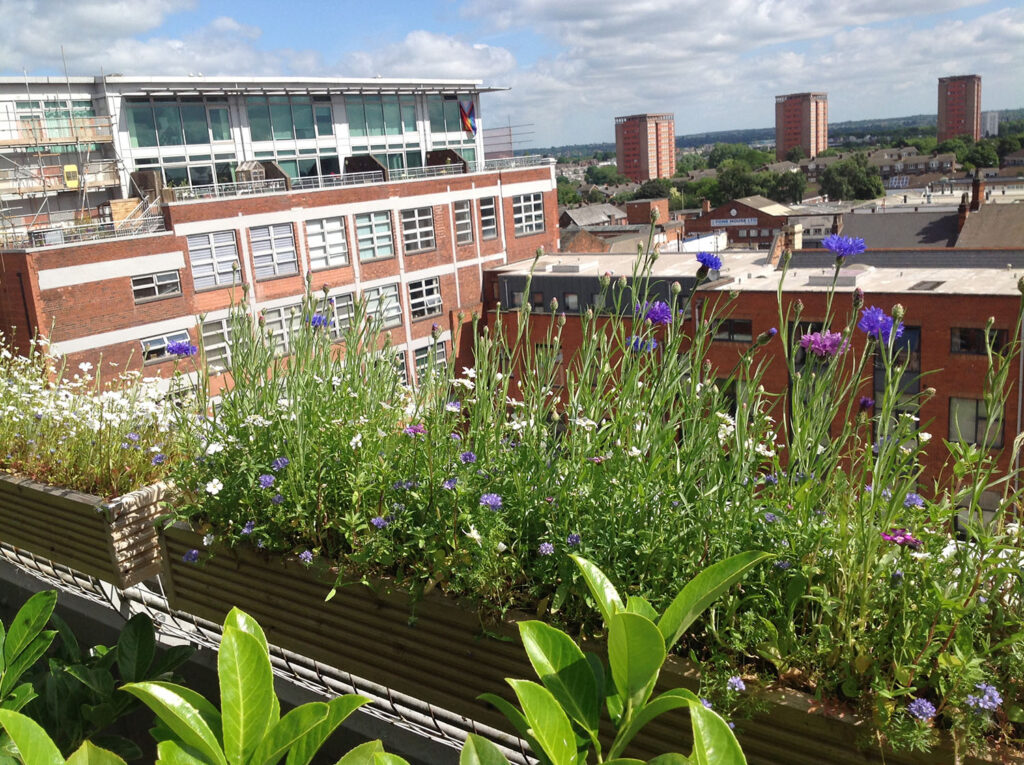
By Thomas Glave in Birmingham
I’m originally from the Bronx, New York, and also Jamaica. I’ve lived in the Jewellery Quarter neighbourhood of Birmingham, just at the city centre’s edge, for about six years. My New York City background exposed me to a variety of urban and roof gardens, in a city where green spaces are infrequent and greatly necessary, as is also true in Birmingham.
I’ve been an ecologically minded person ever since I was a child, perhaps partly due to having grown up in proximity to Jamaica’s gorgeous rain forests. When I was a child, the phrase “climate change” wasn’t heard much, but if you live on an island – or in a huge city – you quickly learn (or should learn) that you’ve got to be respectful and aware of the greater natural world. Climate change news has often invoked alarming stories about bees’ vulnerability; this news began to make me think that perhaps I could do my small bit for bees, rather than just worry about their possible extinction. (Besides, like everyone in my family, I’ve always loved colourful flowers, so planting them for bees would be a ‘win-win’!)
In England, I began to do research on the plants most likely to attract bees and butterflies, and soon learnt that planting diverse flowers would attract and be of great benefit to bees, and would also help achieve a kind of mini-biodiversity. I searched many sources online, and finally ordered packets of the following plants (and probably some others that I can’t remember!)
- Cornflowers (Centaurea cynanus)
- Painted daisies (Tanacetum coccineum)
- Butterfly flower / elegant clarkia (Clarkia unguiculata)
- Dwarf morning glories (Convolvulus tricolor)
- Chinese forget-me-nots (Cynoglossum amabile)
- California poppies (Eschscholzia californica)
- Baby’s breath (Gypsophila elegans)
- Candytuft in white and blue (Iberis variety)
- Love-in-a-mist (Nigella damascena)
- Poppies (Papaver variety)
- Lacy phacelia (Phacelia tanacetifolia)
- Borage (Borago officinalis)
- Pot marigold (Calendula officinalis)
In early March I planted all the seeds in twenty planter boxes fixed to my balcony’s railings, then waited for everything to begin sprouting, as they soon enough did, against a backdrop of grey and brick city buildings.
Bees of different varieties have definitely been visiting, it seems most often in the morning, but also during the afternoons. One of the most remarkable things about this planting experience has been actually spotting the bees and butterflies on this fourth-floor balcony, in a largely treeless Birmingham neighbourhood. You can’t help but think: how on earth did they find the flowers? Their presence seems as impossible, nearly, as that of the birds that have alighted on the balcony in search of twigs for their nests, picked from my small trees’ mulch.
I’m fortunate to have a flat that has enormous windows from which, each day, I can see all the flowers in all their glorious flirtatious colour, beckoning the bees and butterflies to come closer. When I walk around the balcony to water and inspect the trees and other plants, I take in (actually revel in) the flowers’ beauty and the insects’ presence amongst them, and think: of course this all must powerfully affect my sense of wellbeing, as it would anyone’s. We know that greenery, colour, and sensory experiences in the natural world can positively affect us and even impact upon our worldview, perhaps more so than ever in our environmentally vulnerable era.
Who knew that flowers and insects could bring such real joy?
More ways to help
Looking to create a bumblebee-friendly space in your local area? Check our our Bee the change resources here.
Growing my own food for bees and wellbeing
4 August 2022
By Amanda Thomas from Watford
Of all the various wildlife-friendly habitats I’ve added into my wild garden, I’ve found that my herb bed along with the fruit and vegetable beds seem to attract the most bees and other pollinators. I have lots of wild areas in my garden – long grass, wildflowers, log piles, bug hotels, ponds, brambles and a dead hedge, but at this time of year it’s the herb bed that’s absolutely buzzing with life from bumblebees, honeybees and solitary bees to butterflies, hoverflies and moths! I love that growing food benefits nature as well as myself and my family.
One of my favourite herbs to grow is thyme, I have a few different varieties and I love to use it in cooking and to make tea – thyme and elderberry* tea is lovely. When in flower, thyme attracts lots of bees, particularly honeybees and also the very tiny but very beautiful mint moth. At the moment the oregano is in full bloom and during the day it’s covered in bees and gatekeeper butterflies. The lavender is always full of bumblebees as well as both small and large white butterflies and it makes a lovely tea too – I like it mixed with lemon balm and lemon thyme.
I also have rosemary, mint, and yarrow growing in the herb bed which all attract pollinators when they flower and make lovely herbal teas too! This year I also added some salad rocket to the herb bed and it’s grown huge! I’ve not had to buy any rocket for months now and it’s flowered profusely, attracting lots of smaller solitary bees. Earlier in the year the chive and nigella flowers were also buzzing with life.
Just across from my herb bed I have some vegetable beds, fruit shrubs and a small greenhouse where I grow salad crops. As part of my wildlife-friendly gardening ethos I don’t use any pesticides at all as I know how detrimental they are for wildlife, everything is grown in a wildlife-friendly way – slugs and snails are re-homed and aphids are left for the birds and ladybirds to enjoy. Thanks to all the wonderful pollinators, this year we have eaten lots of raspberries, blueberries, strawberries and now the blackberries are beginning to ripen.
I leave some of the vegetables I grow to go to flower such as onions, broccoli, lettuce and mustard as the flowers are fantastic for pollinators. I’ve found that bumblebees really love onion flowers and once the flowers have been pollinated the seeds can then be collected to grow more vegetables next year.
Next to our veg beds we have a pergola which this year has been covered in passionflowers and now passionfruit, it’s a real favourite with bees but last year I grew nasturtiums and cucamelons on the pergola which both have beautiful, bright flowers that attract pollinators and not only do they look gorgeous but both provide food too. Nasturtium flowers, leaves and seed heads are all edible and nutritious – a great addition to salads and cucuamelons make a great, little snack in the garden!
Another great addition to a wildlife garden is native hedging which can also produce food. We have some newly planted, small, native hedges consisting of various shrubs including hawthorn, elder, hazel and blackthorn all of which produce nectar rich blossom in spring for bees and other pollinators and food in the autumn. As the hedges grow bigger there should be enough food for both us and the wildlife. Hawberries, elderberries, hazelnuts and sloe berries can all be used to make various drinks, foods, teas and tinctures.*
For anyone thinking of making their garden more wildlife-friendly to attract more bees and other pollinators I would highly recommend growing herbs, fruits, vegetables and salad crops. Not only will your garden be buzzing with life and provide bees and other insects with the vital food and shelter they need but it will also provide you with healthy, nutritious, organic food, and what’s more the beautiful sounds, scents and sights of the plants and all the wonderful wildlife they attract will almost certainly bring you joy and improve your wellbeing. I love that wildlife-friendly gardening has taught me so much about nature and myself – I wanted to make my garden wild to benefit nature but in doing so I’ve benefited myself in so many ways!
If Amanda’s blog has inspired you to help bumblebees by growing your own food, check out our FREE guides in our Bee the change area!
* A note on berries: collect responsibly and safely, and make sure you are able to correctly identify what you are picking. Please check correct preparation and cooking instructions for any part of a wild plant collected from outdoors.
Our wildlife garden
By Karen Baker from Horsham
We bought our old house with a large garden over twenty years ago and spent the first few years renovating our home and working long hours to pay for it! Here’s how we’ve encouraged a range of wildlife, including pollinators, into our patch over time.
Friendship garden
At first, I only had time to keep the front garden tidy. There is a large flower bed which I started to fill with my favourite blue and purple flowers and called it the ‘Purple Bed’. Friends and family knew this and bought me plants to add. They also offered plants from their own gardens and these have been the most successful.
One friend in particular shared my love of nature and wanted me to take lots of wildlife-friendly plants from her garden as she was seriously ill and needed to know they were cared for. I realised how special gardens are for keeping memories of friends and family, and renamed this part of the garden our ‘Friendship Garden’.
It has developed into a random cottage garden which bees and butterflies love. Their favourites are pulmonaria (from my Granny’s garden), allium, hardy geraniums, aquilegia, purple (and pink) toadflax, red valerian, verbena bonariensis, scabious, and Japanese anemones.
Driveway
Our driveway has its own character. The old fence is covered in lichens and rambling plants including honeysuckle and wild roses. There are also my family heirloom rambling roses: cuttings my parents gave me that originally grew in my grandparents’ garden. More special memories.
There are also quirky garden additions here created by my artistic husband. Planters made from old air compressors, racing tyres filled with plants, a firepit created from gas bottles and made to look like my old Chevy truck, and a gate from engine camshafts. He has made tables and benches for friends as well as us. Like our parents, we have always reused everything – long before “upcycling” became trendy!
Wild Garden
The rest of the garden was left untended for many years and we realised the benefits of this as wildlife came into it from the woodland behind. Gradually we have added features to make this area even more attractive to all creatures.
We started by building a raised deck so we can sit and enjoy time with our visitors both human and animal! The garden slopes down from here. The first part is full of cottage plants that friends gave us – usually as they were too ‘invasive’ for their more formal gardens. Not a problem here as the more the merrier and they mingle with wildflowers that self-seed.
A couple of years ago, we finally created a wildlife pond within view of the deck. This year dragonflies emerged from the pond for the first time. We hope to attract frogs, toads and even newts. We seeded the bank with more cottage and wildflower seeds. This was a riot of colour last year and a stunning mass of wild daisies this year. I will gradually add native perennial plants grown from seed so it will be a colourful display and continue to attract diverse pollinators.
Next there is a row of mature apple trees providing food at every stage from blossom to harvest. I pick a few apples but leave windfalls for wildlife. Roe deer are regular visitors here – last year a young buck came every day. He would doze there for a while and then stagger away – we think he got drunk eating old apples turning themselves into cider!
Really wild garden
Beyond the orchard the garden gets progressively wilder. I encourage the taller plants there including teasels, ragwort, willowherb, evening primrose, grasses, buddleia and a large patch of stinging nettles. Mature ivy rampages over fallen dead trees – buzzing with life in late summer as it flowers. There are piles of old logs, stones, tiles and compost heaps providing homes for many small creatures.
An overgrown hazel hedge turns the last narrow part of our garden into a woodland edge. Primroses, snowdrops and a few English bluebells grow there and in summer it becomes a jungle of tall bracken. A narrow path through here leads to beautiful bluebell woods (sadly not our own).
Feeling inspired by Karen’s amazing wildlife garden? Check out our Bee the change campaign to discover simple actions you can take in your outdoor space to support a range of wildlife including pollinators, birds, and hedgehogs! There are FREE resources to download and a limited number of postal packs also available.
Growing cucamelons for bumblebees
By Bex Cartwright, Bumblebee Conservation Trust’s Senior Conservation Officer
Have you ever heard of a cucamelon?
Last year I tried growing this unusual little fruit. The flowers turned out to be surprisingly popular with bumblebees. So, I thought I would introduce you to them and share some tips on how to grow your own!
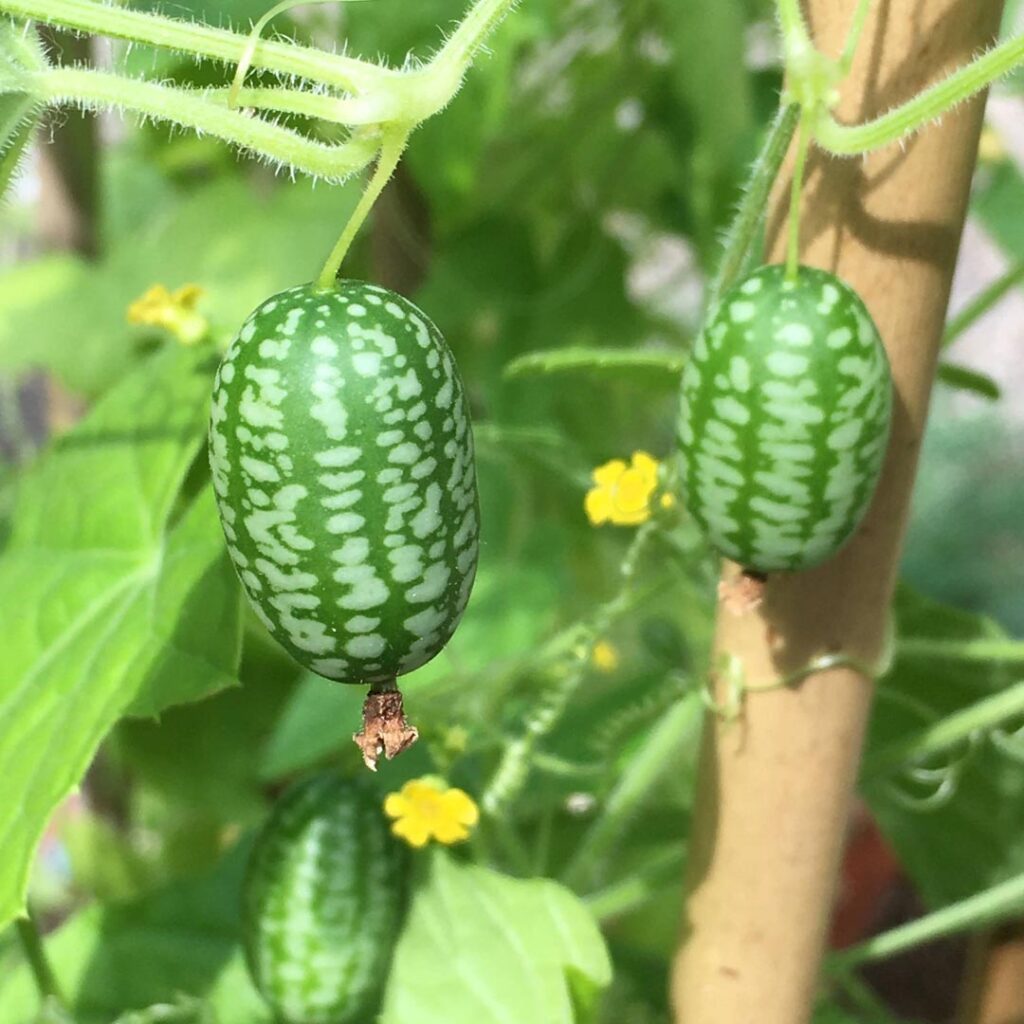
What is a cucamelon?
Cucamelons are also known as Mexican Sour Gherkins or Little Mouse Watermelons (‘Sandiitas de Raton’) and they do look like a mini watermelon. They are in the same family as cucumbers, squashes, pumpkins and courgettes, and are native to South America.
They taste similar to cucumbers with a slight citrus tang to them and a pleasant crunch when you bite into them, like the crunch of an apple.
The flowers are small and yellow and I saw a number of different bumblebees and solitary bees visiting them which was a lovely surprise and bonus!
How to grow cucamelons
- Grow from seed in the spring. As plants from a warm climate, cucamelons need steady warmth to germinate so keep them on a sunny windowsill or in a greenhouse, if you have one.
- After 10-14 days your seeds should start to germinate, but they may germinate at different rates so don’t worry if some take a little longer. Once the plants are big enough to handle, transfer your young cucamelons to individual 9cm pots.
- Once all chance of frost has passed, you can transfer your cucamelons to their outdoor growing position. This should be somewhere warm and sunny with plenty of sunshine.
- Cucamelons are climbing, vine-like plants. I grew mine in buckets of peat-free compost, one plant to each, and gave them a wigwam of garden canes with twine for support to clamber up.
- Water regularly, keep the soil moist but not saturated. You can also use a normal organic tomato feed to boost growth.
- In mid to late summer your plants should start to produce flowers and fruit. They flower and crop for a long period so keep picking them. Enjoy watching to see which bees visit your plants.
- Harvest the fruit when they are about the size of a large olive. I enjoy eating them straight from the vine but you can also use them in salads, tapas-style dishes or in a cocktail!
- You can treat your plants as perennials (plants which grow again year after year). At the end of the season you can save the large root that will have developed, store in compost and plant this out again the following year for an even earlier crop.
I hope this blog has inspired you to give cucamelons a go, they are a tasty addition to any garden and the bumblebees will thank you!
More ways to help
Looking to create a bumblebee-friendly space in your local area? Check our our Bee the change resources here.
Radiant roses: we love them but do our bumblebees?
By Margaret Alston, Bumblebee Conservation Trust volunteer
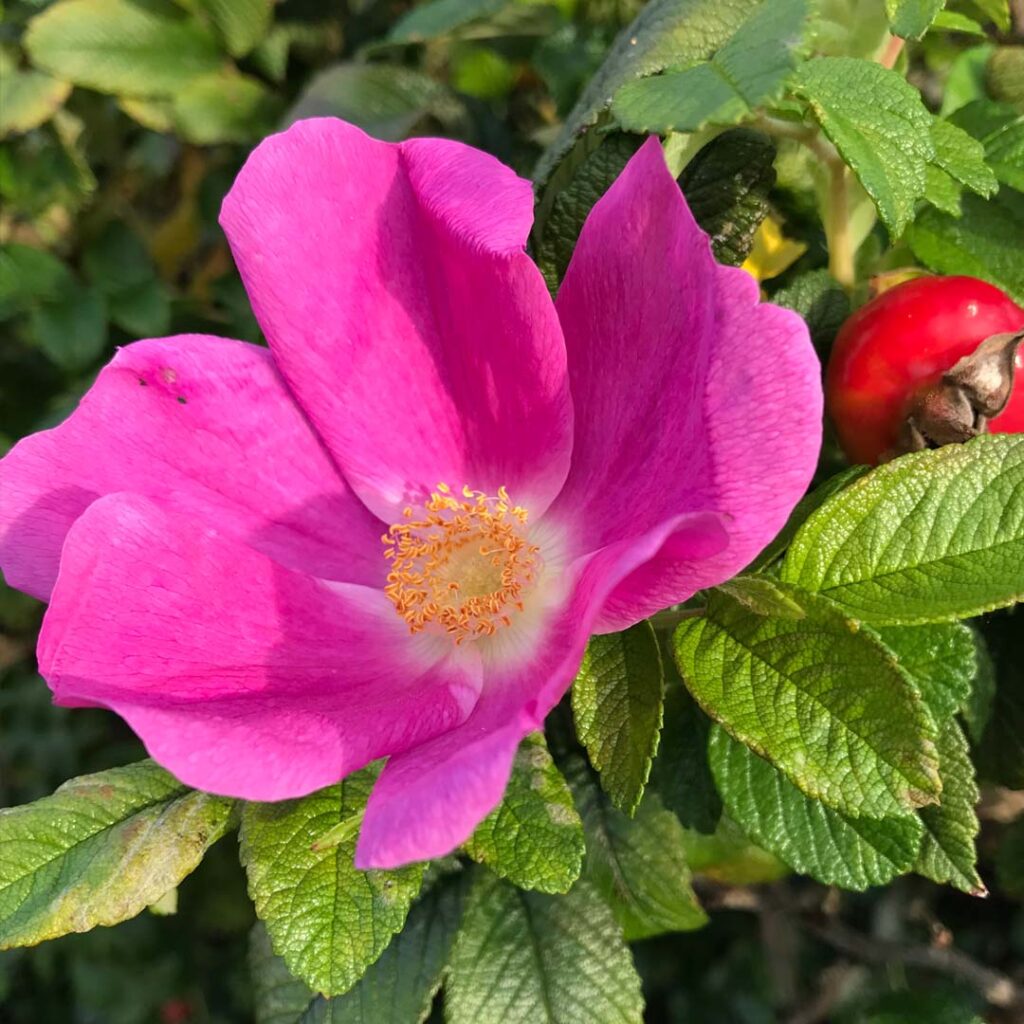
Roses to me were always something that ‘other people’ grew and loved, but not me – that is, until we moved to our present home and decided to include in a hedge for wildlife a couple of Dog Roses (Rosa canina) and the semi-wild Rosa rugosa. Very soon the bumblebees and other pollinators came regularly. The Dog Rose only flowered for a short time sadly before producing traditional ‘rose hips’, but the Rosa rugosa flowered on and off all summer, often while the hips were also there.
To me, though, these were not traditional ‘roses’, which I had always thought of in a more formal setting, unlike my rather ‘wild’ garden. I had never really considered buying roses from a grower until one day when browsing on Twitter, I came across #RoseWednedsay, where rose enthusiasts shared their beautiful pictures. Yes they were beautiful and I was impressed, then hooked… but would it be possible to find bee-friendly traditional roses with as much appeal to bumblebees as my wild hedge ones? Could I ‘Bee the Change’ by planting for pollinators and grow some beautiful roses at the same time?
Trying out ‘bee-friendly’ traditional roses
A couple of years ago, I took the plunge and ordered and planted some bare-root roses. I chose, after a lot of deliberation, roses recommended as ‘bee-friendly’, following instructions carefully, putting two in the ground and three in very large pots. They all grew successfully, giving the most beautiful display.
Were they ‘bee friendly’, though? It’s a much used term nowadays I think. My most successful rose for attracting bumblebees and other pollinators was my ‘Tottering by Gently’ with lovely single yellow flowers. Also reasonably successful in the attracting bees department was my very beautiful ‘Scarborough Fair’, a semi-double open style rose.
Bee the Change top tip! Many ornamental roses offer bumblebees little or no food, because they have been bred to have lots of petals densely packed together. These cover the centre of the flowers, preventing bumblebees from accessing the pollen and nectar. When choosing roses for bumblebees, look for ones with ‘open’ flowers where the pollen and nectar is visible!
Expanding my bee-friendly rose collection in 2023
This year, in early spring I was pleased to receive a rose gift voucher. After doing more research online, asking Twitter Gardening friends and reading what ‘experts’ had to say, I chose four more bare-root roses. These are cheaper than pot grown ones but should be planted November to April (still time then!) My new roses all have very open flowers with stamens showing, making them very accessible to bumblebees and other pollinators. I chose:
- ‘Jeepers Creepers’, a low growing ground cover rose
- ‘A Rose for Heather’, a climbing rose
- ‘Your Lovely Eyes’, a smaller shrub rose which I have put in a large pot (I recommend 45cm by 45cm)
- ‘Ballerina’, a larger shrub rose
All of these roses are ‘repeating flowering’ which means they should flower approximately from June to October and produce nectar for bumblebees and other pollinators. This means, to keep them flowering, deadheading is necessary unless or until they are hip producing. My ‘Tottering by Gently’ does produce hips at the end of the season but I deadhead up until maybe September or early October.
How I planted my bare-root roses
When my roses arrived, I soaked the roots for a couple of days to keep them hydrated before planting. Meanwhile I prepared the different planting places (this time three in the ground and one in a pot). It is worth taking time to consider where to plant.
Until it is established, a rose needs a bit of space to get started so that you can easily monitor its progress. (I once planted one too close to other plants and it didn’t get enough light so was crowded out and didn’t do well at all.)
I dug over the soil thoroughly and then a hole big enough for the roots, about 40cm by 40cm. I added plenty of a peat-free mixture of soil conditioner and composts, and sprinkled mycorrhizal fungi into the planting hole. (This beneficial fungi grows in association with roots, helping them by effectively increasing their absorptive area.)
I then placed in my rose, covering the root with my compost mixture then soil, keeping the bottom of the stems below the top of the hole. Finally, I firmed the soil carefully round the newly planted rose.
Hopefully many bumblebees will visit my newly planted roses… I shall be sharing photos and updates on our Twitter and Instagram accounts: @bumblebuddeez #RoseWednesday
Please join us … growing roses to #BeeTheChange!
Autumn update
Now here we are nearly at the end of September and our roses have indeed been ‘radiant’ and we love them but… did our bumblebees love them too?
By adding to our collection of early blooming bee-friendly roses, with some repeat flowering ones, I was hoping to extend our bee ‘banquet’ of roses throughout the summer. It did not quite work out like that though!
The first roses to bloom in early June were in our wild hedge. These were the Dog Rose (Rosa Canina) and also the Beach Rose (Rosa Rugosa). Bumblebees were immediately attracted to them, alerting us to their presence with their high pitched and frenzied buzzing. Such a wonderful ‘sound of summer’ that I have since learned is when bumblebees use ‘buzz pollination’.
I had read and heard about this wonderful phenomenon but hadn’t actually connected this to the joyful sound the bumblebees made in my ‘rose hedge’. It became clear when I read an article by Nikki Gammans, the Bee Connected Project Manager at Bumblebee Conservation Trust, entitled ‘Buzz Pollination’, where she explains in simple (well relatively simple for a non scientific person such as myself) terms how this process works! Instead of having a bumblebee frenzied jollification as I had thought, our clever friends the bumblebees were using their ingenuity to release more pollen.
As the Dog Rose season is relatively short and is usually over in July, as is the beach rose, although they do tend to flower on and off into the autumn, my plan had been to plant more repeat flowering roses to extend the growing season. I had looked for and planted roses which had an open arrangement of petals with the centre visible and pollen available. As all gardeners know, it is difficult to choose plants from catalogs and even recommendations as what suits one garden may not suit another.
I found with my ‘new roses’, ‘Jeepers Creepers’ and ‘Your Lovely Eyes’ started flowering in June and ‘Ballerina’, which I had planted later, not until early July.
Unfortunately ‘A Rose for Heather’ did not flower at all – wrong place I think so am going to move it later on. My three ‘bloomers’ though have been really beautiful.
But… did the bumblebees like them?
I would say ‘Your Lovely Eyes’, although indeed lovely and the most floriferous of the roses with a lull in blooms during August and then a glorious come back, was the least attractive to bumblebees, which occasionally and sometimes briefly visited. The blooms although beautiful, and centres visible, tended to make a cup shape which I think deterred the bumblebees.
The ‘Ballerina’ blooms were small and came in clusters, with each bloom lasting a very short time which was when bumblebees were attracted. This beautiful rose finished flowering in August and did not return but I have great hopes for next season so this is definitely one to watch.
The most successful rose, as far as the bumblebees were concerned, is our ground cover rose ‘Jeepers Creepers’ whose blooms are like an ornamental version of the dog rose. Whenever this rose started to bloom along came the bumblebees with their wonderful high pitched BUZZ. It did flower until the end of July but then a long lull until just a couple of weeks ago when it has flowered once more.
My most successful rose was ‘Jeepers Creepers
A big hit with bumblebees!
Unfortunately now our bumblebees are rather scarce. I think according to other gardeners, many ‘repeat flowering’ roses were slow to return this year.
Dead heading is a must once ‘repeat flowering’ roses start to bloom for the first or second time… it really does encourage beautiful roses to bloom for longer.
Hopefully some of you joined me on my rose journey. I have great ‘rose’ hopes for next year, taking care of my precious plants and perhaps I could find a place for just one more rose?
More ways to help
Looking to create a bumblebee-friendly space? Check our our Bee the change resources here.