Winter husbandry for solitary bees
17 November 2017
By Ron Rock, Bumblebee Conservation Trust Volunteer
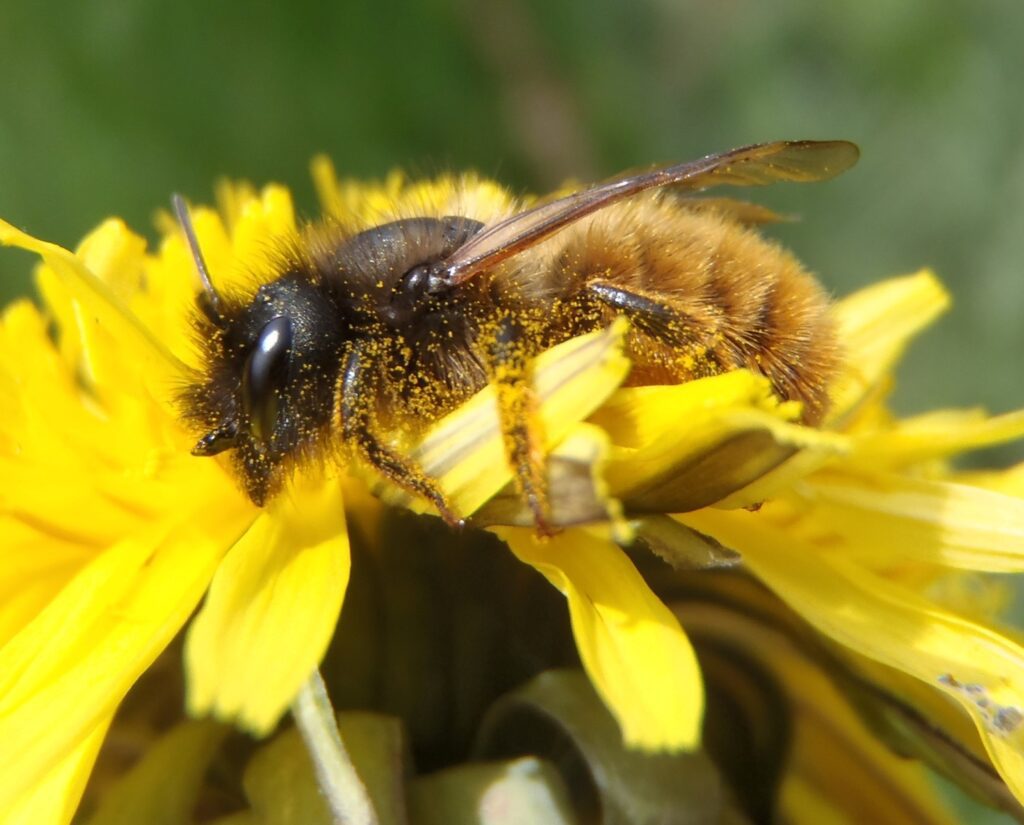
And so, we reach the end of another bee year. As I write, there are just a few Common carder bees still in the garden. The Red mason and Leaf-cutter bees are long gone but mud and leaf filled tubes in the bee nesters are evidence that their work has been done. Another generation is already in place and will emerge next spring and summer. But will it? Are bee nesters a fit and forget option in our gardens? Will the bees emerge and happily go on year after year? Sadly, the answer is probably not.
By attracting these bees to our gardens, we are encouraging them to nest in far higher densities than would occur in nature. As a consequence, parasites find bee nesters just as welcoming as the bees themselves. Left unchecked, pests and disease can completely wipe out your bee nester population in a relatively short period of time. It should be our duty to open, inspect, clean, and replace used nesting tubes annually to ensure the health of our solitary bee guests.
The ‘unwanted guests’ in the bee nesters include mites, flies and parasitic wasps which can all have a highly detrimental effect on the intended occupants. No matter how well maintained, bee nesters will attract a certain amount of unwelcome attention during the course of a season.
When all of the activity has ceased, I move my nesters into a sheltered part of the garden to protect them from rain and to allow the bees to pupate and metamorphosise into adult bees to take place. In nature, the bees would remain quiescent in their cocoons until spring, but at this point I step in and give them a helping hand. I use a combination of routed out trays, cardboard tubes with paper liners and — although some would frown upon it — bamboo tubes drilled out to appropriate sizes. I have never had a problem with bamboo, and I have found that the number of parasitised or failed cells is about equal in all three types of nesting cavity.
The ‘Pests’
(Details of the lifecycles of the following creatures are available on the internet. I will concentrate on illustrating how to keep their numbers in check for the sake of the bees.)
Mites
(Chaetodactylus osmiae). Bamboo cane on opening above. One cell is heavily infested with mites. The black specks on the left of the healthy cocoon are larval droppings, this is completely normal. Red mason bee larvae move the droppings out of the way before spinning their cocoon whereas Leafcutter bees incorporate droppings in theirs. The mites are the flesh coloured mass to the right of the yellow powder (mite droppings).
(Cacxoenus indigator) – a cleptoparasitic fly, at least in its larval form. The larvae of Cacxoenus indigator, the assassin fly. These fruit flies enter bee nesters through the tube entrance when the bee is away from her nest. When her eggs hatch, the grubs consume the pollen that was meant for the bee larvae and the bee grub starves to death. If only a few eggs are laid you just end up with a small mason bee, but a larger amount as here means no bee at all.
(Monodontomeros obscurus) – These tiny little wasps can be particularly troublesome, especially in nesters that are populated with thin walled plant stems or unprotected paper straws. Cardboard or bamboo tubes seem to protect against their attacks, at least in my experience. This is a wasp which oviposits up to ten eggs into a cocoon. The resulting larvae then eat the developing bee and overwinter as fully developed larvae within the infested cocoons. Reject any cocoons that don’t feel ‘right’. A healthy cocoon is firm to the touch, though male cocoons sometimes have dimples in them. Keep any you are not sure of in an escape proof container and see what emerges in the spring.
Safe opening of bamboo tubes
It can be a little dangerous opening bamboo tubes as I found out to my cost a few years ago. To do it safely you all you need is a simple device. This consists of a length of 75mm x 50 timber screwed to a base of 150 x 25. Two holes about 120mm deep are drilled into the 75 x 50 which are large enough for the bamboo tubes to sit in. Then if you insert a sharp knife 10mm deep across the entry end of the tube and twist it left and right the tube will open cleanly. Keep one hand on the knife handle and the other flat on top of the blade for safety. Never allow children to do this unsupervised.
Cleaning cocoons: initially, the cocoons can be cleaned by sieving them in fine horticultural sand, then you can use a soft artist brush to clean, followed with a damp cotton wool pad if required.
Cleaned cocoons, don’t forget to dry them before storage, pat them gently with some kitchen towel then leave them on another piece of kitchen towel to dry for a few minutes. Storing the cocoons when damp can lead to problems with mold which can be simply wiped off should it occur, but why create problems when a little care ensures this doesn’t happen in the first place.
Bamboo tubes should be replaced annually, though ones drilled out to 8mm can have a CJ paper liner fitted and used again. Wooden trays can be cleaned with boiling water, scrubbed with an old toothbrush and left outside to dry before going back in the nester. Tubes and slots should be at least 160mm long. 8-10mm diameter holes are good for red mason bees and 10-12mm for leafcutters. Tubes of 3-7mm may attract other types of bee too. The nesters themselves can be scalded out with boiling water and any maintenance needed doing in the autumn. Store them indoors during the winter, load them with new tubes in the spring and then you can sit back and be richly entertained by these wonderful little bees.
Refrigerate cocoons in plastic trays on a bed of damp kitchen towel. The tub of water keeps up the humidity levels to stop the bees from dehydrating. Add paper towels in the storage trays which should be dry by the way. If stored in a fridge you will need to keep the humidity levels of 60-70% so some sort of humidity indicator will be needed A temperature of around 38 – 40 degrees Fahrenheit is perfect.
Ready for the new season, the box below the nester is a release chamber where the cocoons are placed in the spring. Small nesters like this are easier to look after than the huge ones that seem to be in vogue at the moment. Small is beautiful in my opinion. The flowering currant in the background is a magnet for bees of all types when in bloom, bees at the front door, it doesn’t get any better than that!
Some may say ‘let nature take its course’, but if we put out bee nesters then surely the aim is to increase the population of bees in our gardens. That said, you can reach a bee overload situation in which case I ask friends and neighbours to host a nester in their own garden. By adopting this form of husbandry you can increase the numbers of Red mason bees year after year (given the vagaries of the weather). And if you can get a child or two interested in these lovely little creatures then surely that can only be a good thing!
Look out for another exciting installment in February, when I will give you some advice on putting your nesters outside ready for the new season, and also how to deal with Leafcutter bees. These bees overwinter as pupae so their cocoons should be left well alone until next spring.
If you would like to know more, then please get in touch with ronrock@phonecoop.coop.
Convert your lawn into a meadow!
3 September 2014
We have another guest blog this week, from Bumblebee Conservation Trust supporter Eric Homer. Read on to find out what he did and see his results…
My wife and I are keen on helping wildlife and enjoy encouraging wildlife into our garden. We get a lot of pleasure seeing the birds, bees, butterflies, frogs, newts and insects in the garden, so last year we decided that we’d like to make the garden more bee friendly by converting the back garden lawn into a wildflower meadow, hopefully attracting more wildlife into the garden and helping the bees and other species. Our suburban garden is not large and the lawn only covered a small area, approximately 20m². We wondered if a small area like this would have any effect, but we were not disappointed.
I had a look on the internet for guidance and there were different opinions and ways of going about the conversion. Not sure how to approach the project I sought guidance and advice from the BBCT on the best/easiest way to convert the lawn into a wildflower meadow. Anthony McCluskey from BBCT responded to my enquiry with good advice and guidance.
The most important thing to do when planting a wildflower meadow is to remove as much grass as you can from the area. Some people use herbicide or dig it up, or you can cover it with plastic sheeting for as long as possible. This will destroy any grass underneath, and give you a blank canvas to work from. This is important because grasses will compete with wildflowers, and are the main reason why wildflower areas don’t work.
After that, the seeds can be sown. Do this in autumn or spring, after raking the soil so that it’s fine. You should then cover gently (e.g. by raking again) and water well. You’ll need to keep watering them to make sure they germinate, and after the seedlings come up they should be fine. He provided me with this link to Habitataid where I found more information and links to other resources including seed suppliers, sowing rates etc. which was very useful. This site also has a video to explore the different ways it can be done.
We took the plunge in September 2013. We were only converting a small area so we decided to dig up the turf, still a major job and hard work, and then prepared the ground. We then sowed our seedbed. Preparing the ground and sowing in the autumn can help some wildflowers as some of the seeds fair better if they can germinate over the winter. We thought that this would hopefully give us quicker results.
As it was a small area we decided to go for wildflowers only rather than a wildflower/grass mixture. We used seed sent to us by the BBCT when we joined, some we’d collected ourselves on our walks and bought some from one of the suppliers recommended by habitat aid. I don’t think it stopped raining since we sowed so watering wasn’t an issue.
October was relatively mild and wet and we had shoots coming up in November which we hoped were wildflowers and not rogue grasses. Anthony’s advice was that at this stage the most important thing to do is to make sure that there is no disturbance of the seedlings (just in case you have dogs or cats that like to dig!). Over the winter we seemed to have nothing but rain and the newly seeded meadow was flooded on several occasions giving us concern over germination.
In early spring we decided to plant some plant plugs to add some species not contained in the seed packs that we’d sown. We bought some wildflower plants from the garden centre, split them and distributed them over the meadow. We also added some wildflower plants that were in a friend’s garden.
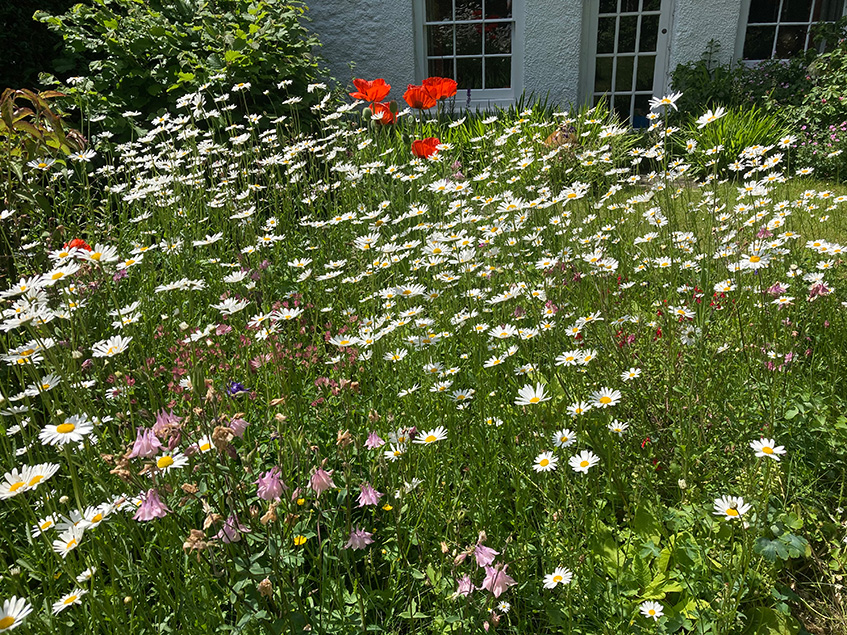
Slowly but surely the meadow started to develop, they say patience is a virtue. It took eight months from sowing to seeing significant results but the wait was worth it. The photographs to the right below show the early progress.
The meadow, although in the infancy of its first season, has attracted greater numbers and varieties of hoverflies, moths and butterflies. The goldfinches and sparrows have also taken a liking to the cornflowers. The numbers of bees in the garden has also increased dramatically. They seem particularly attracted to the cornflowers, scabious and bird’s foot trefoil.
Two hoverflies that we have not seen in the garden before that were easier to identify are the Large pied or Pellucid Hoverfly (Volucella pellucens) and a hornet mimic hoverfly (Volucella zonaria). Butterflies new to the garden are the Common Blue, Meadow Brown, Ringlet and Small Skipper, all seen on the meadow. We’ve also had our first 6 spotted Burnet moth in the meadow.
We are very pleased with the results so far, we are enjoying the experience immensely and excited to see what else might spring up next year or be attracted into the garden.
Check out more planting guides and resources with our Bee the change campaign here.
Making bumblebee nest spaces
Having bumblebees nesting in the garden is a great way to learn about them. If you have a nest, you may at first just see a single queen carrying food to the nest, which she stores for her future offspring. A few weeks later you should see the first worker bees who will be helping the nests get larger, and hopefully they’ll soon be followed by new queens or males, which should mate with males and queens from different nests before the new queens go into hibernation.
Providing nesting sites for bumblebees can be as simple as just leaving a quiet spot somewhere such as a corner or behind a shed, and letting the weeds and grass grow tall. But if you want to go further than that, you could try making a bumblebee nest space yourself. We have teamed with up with the people at Hartley Botanic to produce this guide for making bumblebee nests. It may seem strange to think about nesting bumblebees in late summer, but if you make one now you may find that mice will use it over the autumn and winter. Bumblebee queens searching for nests actually seek the scent of mice when looking for nests. Having the mice in residence now could increase your chances of having your very own bumblebee nest next year.
So go on and have a go, and let us know if you have made any successful bumblebee nests yourself!
Feeding the bees in winter
By Peter Lawrence, Trust member and keen gardener.
Here, Peter gives us a run-down of his best plants for bumblebees in winter. As Peter points out, bumblebees are becoming increasingly active in the winter months when they would normally be hibernating. If you spot a bumblebee this winter, you can report it to BWARS for their special survey on winter-active bumblebees.
I don’t know about you but every time I see a bumblebee my morale takes a little leap upwards before it starts to sink again. They are wonderful beasts.
We have a large garden and I try to grow nectar-rich flowers all the year round. I thought my information might help others with ideas for flowers that the bumblebees evidently like, particularly during the harsh winter months. I know they are supposed to be underground in the winter, but the winters are getting shorter and I see bumblebees every month of the year in my garden, near Cambridge, on alkaline soil.
One group of plants that can flower from summer and well into autumn are the calaminths (Calamintha). They will provide food for the new queens before they go into hibernation.
But as we move into autumn, November can be a tricky month for flowering plants. The ivy is still flowering in some places well into late November, and that can be a great source of pollen and nectar. Indeed the ivy bee (Colletes hederae) relies on the food from ivy flowers. This species is a recent arrival to England and we have them in our garden well into November.
There are also autumn crocusses (Colchicum autumnale), and plenty of flowers on the wonderfully-scented Viburnum (Viburnum x bodnantense), but I don’t see the bees appreciating it so much. We have some sternbergia (Sternbergia lutea) which would have golden yellow, goblet-shaped flowers if it weren’t for the pheasants which eat them! This November, some of the salvia are in a sheltered site and still undamaged by the frosts so they provided nectar for some busy late queens, particularly the Tree bumblebee (Bombus hypnorum) and Buff-tailed bumblebee (Bombus terrestris).
I have to admit, we don’t have much on offer in December. Between cold snaps there are fresh flowers on the Autumn-flowering cherry ‘autumnalis’ (Prunus x subhirtella) and still some late autumn crocus and that’s about it. November and December do present problems for any bees that are still about, so if anyone has any good ideas please tell us.
January is a most difficult month, but the Autumn-flowering cherry should still be in flower, and the Christmas rose (Helleborus niger) should begin to bloom too. If it’s at all mild, the really essential winter honeysuckle (Lonicera x purpusii) will provide fresh flowers and nectar for all manner of bees well into the spring. In sheltered parts of the garden the first crocusses, snowdrops (Galanthus) and aconites (Eranthis hyemalis) may be flowering and the bees like these, as well as the winter iris (Iris unguicularis).
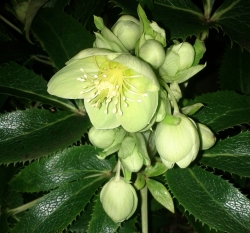
In February, the various mahonias are favoured, and they sometimes flower in February. After the winter honeysuckle, the most important of all winter-spring flowers for the bumblebees is stinking hellebore (Helleborus foetidus). This wild hellebore is preferred over the Helleborus orientalis, although they like those also. Every garden should have as many Hellebores as possible; they grow in shade and all the bees, including the Hairy-footed flower bee (Anthophora plumipes), the mason bees (Osmia bicornis) and the queen bumblebees go for it. They usually start to flower in March and various cultivars will keep going well through the spring and early summer.
In March there are now plenty of flowers, the bees will visit the honeysuckle (Lonicera) and the Hellebores while the plum blossom (Prunus mume) may be starting. Norway maple may come into flower this month, and can be very attractive to the first queen bees to emerge from hibernation.”
To find out more about how to make your garden better for bumblebees, visit our Bee the change resources.
How to help bumblebees in summer
By Miranda Shephard, Bumblebee Conservation Trust Information Officer
Summer is the best time of year to enjoy watching bumblebees as they rely on flower-filled gardens and community green spaces in order to find food, nest and raise the next generation. Summer is also a great time to help bumblebees (and of course other garden wildlife) so read on to discover how you can make your outdoor space as welcoming as possible for your local bumblebees.
We’ll start by taking a look at what bumblebees are doing at this time of year, before finding out what you can plant in summer and whether you need to provide water for bumblebees. Finally, we’ll guide you through what to do if you discover a tired bumblebee or a bumblebee nest.
Contents
Click on one of the links below to find out more:
- What are bumblebees doing in summer?
- What can you plant for bumblebees in summer?
- Do you need to provide drinking water for bumblebees?
- How to help tired bumblebees in summer
- If you find a bumblebee nest, leave it ‘bee’
What are bumblebees doing in summer?
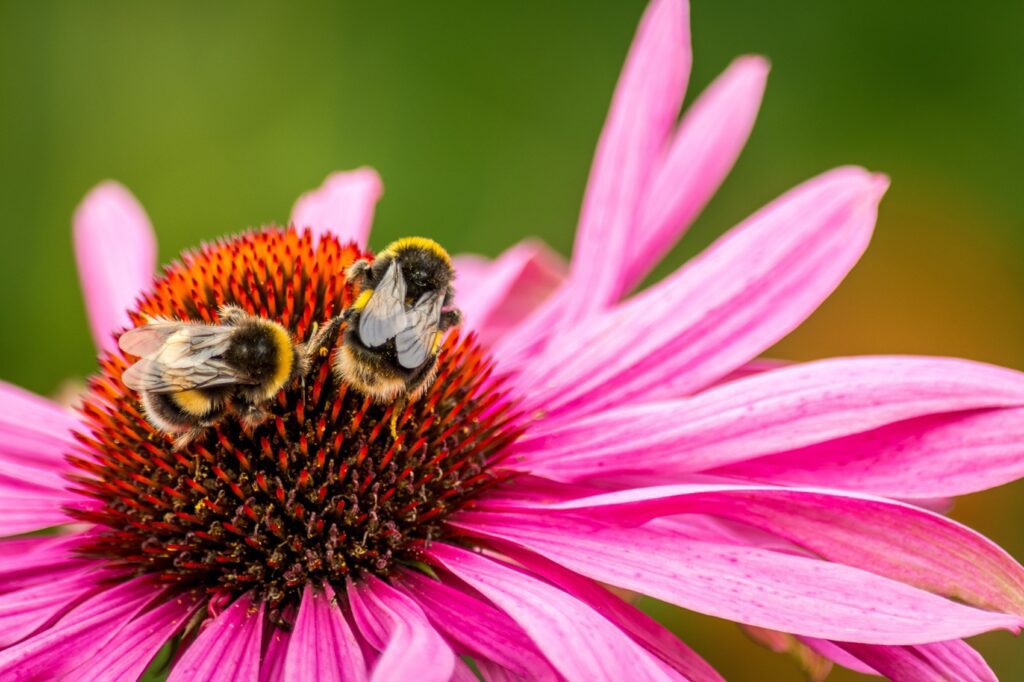
By the time summer arrives most of the bumblebees that you see will be workers. These often petite bumblebees are the daughters of the large queens that you might have seen feeding on early spring flowers. Fueled by nectar, it is the workers’ job to forage for more nectar and pollen. Back at the nest, the collected nectar sustains the queen and other workers while the pollen is fed to the developing bumblebee larvae.
Towards the middle of summer, when some nests can have a few hundred workers, they switch to producing new queens, who require even more food, and males. Once they reach adulthood these bumblebees will disperse, feed and seek out mates. Some queens then enter hibernation while others will make the most of plentiful food and start their own nest which, after four to five weeks, will result in a new generation of workers.
Different bumblebee species have slightly different emergence times and some, like the aptly named Early bumblebee, can successfully complete a nest cycle before others, such as the rarer Broken-belted bumblebee, have even emerged from hibernation. Other species, such as the Common carder bumblebee, are commonly seen all through spring, summer and autumn. This variation is the reason why it’s so important to have flowers from early spring all the way through to late autumn.
What can you plant for bumblebees in summer?
With all that bumblebee activity taking place, it’s important to provide lots of flowers throughout the summer. Different plants can produce varying amounts and qualities of both nectar and pollen so it’s a good idea to have a variety on offer. This will not only look beautiful but also let bumblebees, and other pollinators, choose the flowers which best meet their nutritional needs.
Many of the summer flowering plants prefer to be planted as seeds or young plants earlier in the year, but you can still visit garden centres or local plant sales and buy pot grown plants that are in or just about to flower. Some excellent bumblebee-friendly plants to look out for are Catmint (Nepeta species) and Nasturtium (Tropaeolum majus).
In summer you can also plan ahead to other times of year. Both autumn or winter flowering mahonia (Mahonia species) and spring flowering currant (Ribes sanguineum) shrubs can be planted in summer and will support bumblebees at times when there are not many flowers around.
Plants can struggle with being moved in summer, particular if it’s very warm and dry, so leave planting out until the evening and make sure they are well watered before and after they’re established. Depending on where you live in the UK, cooler wet weather might be a problem too but adding grit to compost or soil can help with drainage and avoid waterlogging new plants.
After bumblebees have visited and pollinated the flowers, plants naturally switch to seed production. By removing dead and dying flowers, you can encourage plants to produce more flowers so try to achieve a balance between leaving some flowers to develop into seed (for both hungry birds and of course for you to harvest to grow next year) and dead heading to encourage more flowers.
Do you need to provide drinking water for bumblebees?
Do bumblebees drink water? The simple but perhaps surprising answer is not really! Bumblebees generally get all the water they need from drinking nectar, even in very hot weather.
The best way to help bumblebees get a drink is by watering your plants so that their flowers keep producing nectar. In hot sunny weather, try to water plants and containers at cooler times of day, such as early morning or late evening, and at the base of the plant. This reduces evaporation and can help plant roots make the most of the water.
Other pollinating insects, such as honeybees and flies, will make use of water if it’s easy to reach in a shallow container. If this is something you’d like to do, place your water feature in a shady spot and make it even more insect friendly by adding a handful of small pebbles as perches.
There’s no need to leave out containers of sugar water or honey as bumblebees and other insects will be much healthier feeding on the natural sugars in nectar from your flowers.
Other areas of water, like pond edges, boggy patches or even a container of wet soil, can provide valuable mud for other wildlife, such as Red mason bees (Osmia bicornis) who will use it to construct their nest cells. Larger wildlife, like swallows and house martins, may also visit as they too use mud to make their nests.
How to help tired bumblebees in summer
Although bumblebees can be spotted from early spring all the way through to autumn, individual workers and males only live for a few weeks. So, it’s quite common to find tired bumblebees who are naturally approaching the end of their life. These bumblebees may look a little odd with faded or missing hair. It can be a tough job being a bumblebee!
You may also see new queens and male bumblebees sitting about on flowers or other surfaces. They don’t collect pollen for the nest and are just conserving energy by having a rest.
If you come across a tired or resting bumblebee on or near flowers, the best thing to do is to leave it alone to let nature take its course. If it is somewhere vulnerable, like on a pavement or indoors, you can gently move it to somewhere more suitable. If possible, choose somewhere that has flowers so the bumblebee can feed if it wants to.
We know that many people just want to help but it’s best to avoid giving sugar water which, just like sugary drinks for people, is not very healthy and doesn’t give all the nutrients a bumblebee needs. If you’re concerned about a bumblebee, and are tempted to give it sugar water, you can read more about when and how to give sugar water.
If you find a bumblebee nest, leave it ‘bee’
Sometimes, people have no idea that bumblebees are nesting close by until they notice an increase in bumblebee activity or accidentally disturb the nest in some way. In either case, provided the bumblebees are given a little space, there shouldn’t be anything to worry about.
Bumblebee nests are usually only active for two to three months. Towards the end of that period, there can be an increase in bumblebee activity around the nest entrance. This could be workers coming back and forth with food or it could be new queens dispersing from the nest. If it’s a Tree bumblebee nest, it could also be a gathering of males waiting for those new queens to emerge.
There’s nothing to worry about though as bumblebees are generally more interested in themselves than in the people around them. You can minimise disturbance by keeping children and pets away from the area or by using a temporary barrier to prevent them being too curious. An upturned wire hanging basket placed over a nest entrance can allow the bees through but keep curious fingers and noses out.
If you accidentally disturb a nest, just gently replace any coverings and give the bumblebees a little time and space to recover. The workers will pull together and rearrange materials to get the nest back to the way they want it. Then for the next few weeks while it’s still active just avoid the immediate area.
Remember to take time to enjoy watching them too!